Replacing Your Home’s Exterior Wall Panels: How to Guide
Installing exterior panel siding onto your property enhances its aesthetic appeal and improves insulation and protection against adverse weather conditions. Because of their importance, what would you do if it gets damaged? How would you replace your home’s exterior wall panels?
If you need to replace your old wall panels, there are several steps you can take to ensure it is as strong or even more robust than when you started. These steps are:
- Removing Old Wall Sheathing
- Measuring the Exterior Walls and Marking Wall Studs
- Inspecting and Replacing Structural 2x4s and Plywood Sheathing
- Applying Insulation and House Wrap
- Priming Panel Edges
- Marking Stud Locations
- Laying the Starter Row of Cladding
- Planning Installation Locations
- Overlapping Consecutive Rows of Cladding
- Final Touches
This guide will provide a more detailed look into replacing your exterior wall panels. By following these steps, you can be confident that everything is taken care of and rest easy knowing that you have new exterior cladding to protect your home.

Steps to Replace Your Home’s Exterior Wall Panels
With the greater risk of adverse conditions like rain and snow, replacing any aging or deteriorating wall cladding is essential as soon as possible. You can protect your structure from further damage by taking proactive steps now. Here are a few steps on how to get new exterior wall panels:
1. Removing Old Wall Sheathing
To start, position the extension ladder so you can reach the peak of the wall. It’s best practice to place a utility trailer near the wall to catch any boards that may fall. Use a pry bar to loosen each wood cladding piece and gently jiggle it for removal. Then repeat this process in several spots until the cladding sticks out around half an inch from its original base.
Start by inserting the metal cutting blade of a reciprocating saw under the cladding piece. Cut through the nails to loosen them up. Take off the cladding from the wall and discard it into the trailer. Finally, use pliers to take out the rest of the nail pieces completely.
If you want to upgrade your ceilings during this renovation, a suspended drywall ceiling grid panel is perfect for any home or business. This simple addition provides safe and easy access to your ceiling utilities. You can install lighting fixtures, air conditioning vents, and much more without risking damage to your walls or ceilings. With an access panel, you can ensure that your renovation project finishes right the first time – saving you time, energy, and money in the long run.
2. Measuring the Exterior Walls and Marking Wall Studs
Accurate measurements are essential when installing wall panels, as they’ll help gauge how much material you’ll need. A long-reaching measuring tape is the best tool for gathering the necessary measurements for this task. It’s essential to take precise measurements to achieve a professional and polished look with your wall panels. Even the slightest measuring mistake can significantly affect the outcome, so double-check your work before installing.
3. Inspecting and Replacing Structural 2x4s and Plywood Sheathing
Before installing exterior wall panels, it’s essential to ensure the structural 2x4s and plywood sheathings are in good condition and free from termites. Any damage to materials can prove costly in the long run, as it may require repairs to avoid further problems. That’s why taking time and inspecting each material before installation is essential.
After replacing damaged structural pieces, spraying insecticide around the structure’s base can also help prevent further issues. This step will help ensure that your home or building stays in top condition and free from any wood damage in the future.
4. Applying Insulation and House Wrap
It may seem like a good idea to cut corners and save time when self-installing projects by skipping the steps of house wrap or foam installation.
Properly installed insulation and house wrap help protect against the elements. Additionally, you’ll save money on your building’s heating/cooling costs.
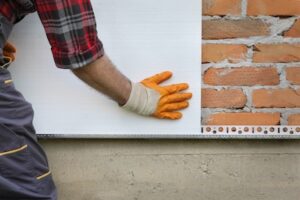
It’s essential to wrap your home correctly with the desired house wrap and seal the edges to the sheathing using tape or caulk. Afterward, you can place foam insulation and secure it down using nails.

5. Priming Panel Edges
Plywood cladding is popular for interior and exterior walls, but priming the panel edges before installation is essential. The plywood edges are very porous and can easily absorb moisture and other elements, leading to rotting or warping over time.
To ensure your plywood cladding lasts for years, prime the panels yourself, even if you purchase pre-primed wood panels. Moreover, keep a brush and primer handy to prime all the edges after cutting them to size.
6. Marking Stud Locations
During this step, you should locate the wall studs accurately before installing the cladding. It helps ensure that your exterior walls can be attached properly, reinforcing the structure and providing stability.
It is essential to mark the stud centers before installing the panels. Strike a plumb line with a level where the two panels will join so you can quickly identify them later. Using a lumber crayon for marking makes it easier to spot.
7. Laying the Starter Row of Cladding
Before you begin, you must ensure your boards are the appropriate size. They should fit horizontally along the bottom of your wall, with the first row evenly covering its width.
This step will ensure that all subsequent rows are level and make your finished product look professional.
8. Planning Installation Locations
When installing the cladding, consider the width to avoid having thin slivers near the sides. Also, take note of the spacing between studs which should be either 16 or 24 inches apart so that the edge joints lay on top of a stud.
For the first panel, you may have to cut it lengthwise. Ensure the underlap extends beyond the stud to nail through its overlap with the next piece.
9. Overlapping Consecutive Rows of Cladding
Overlapping siding materials is crucial to ensuring a successful installation. Regardless of the type of siding chosen (wood, vinyl, metal, or concrete board), ensure that each row overlaps the one beneath it and that all joints seal tightly.
Unsealed joints can create opportunities for moisture and insects to enter your home, so it’s essential to take extra precautions when installing siding.
A properly sealed joint ensures you get a watertight seal around the back of the panels. This step will protect them from water damage and help extend their lifespan. Many panels have a declination line on the back to make it easier to align them accurately when installing them.

10. Final Touches
Using unique finishing products for certain outside wall surfaces provides extra protection and a professional appearance. As an illustration, if you’re putting up vinyl siding, J channels must be utilized for inside curves.
The final step when reinstalling exterior wall panels is to add trim and corner pieces. For other materials, such as wood, cement, or stucco, these trim pieces can enhance the look of your walls, and you must install them after completion.
Reinvigorate Your House With New Exterior Cladding
Installing new exterior cladding can be a great way to give your home a facelift and provide improved protection against the elements. Not only will it make your home look better, but you’ll also get the added benefit of better insulation, energy efficiency, and increased durability for years to come.
