Living Room Christmas Decorations to DIY
Christmas can be an expensive time, so why not save money on making your own Christmas decorations? 2021 was an expensive year for many in general, not to mention the financial strain the pandemic has put on many of us. This is why DIY Christmas decorations are such a good idea!
Here are 9 DIY decorations that will have the halls of your home or local business decked and your boughs full of holly:
1. Decorative Christmas Picture Frames
What You Need:
- photo frame with a glass pane
- Christmas lights (decorative ones work best because they’re not too bright and distracting)
- craft paint (optional)
- glitter (optional)
Directions:
- You can find cheap photo frames at dollar stores or online. Make sure it’s the kind with glass panes so you can easily put in Christmas lights. If you have an old frame lying around, this would be a great use for it!
- Paint your frame green (or another color you like) and let it dry.
- If you want to add extra detail, paint on a white border or silver stripes in between the green sections. A little bit of glitter is also very nice! Let this layer dry before putting your lights in so it won’t get painted onto them when we turn them on.
- Put your lights in and turn them on! This decoration is very cute because you can’t see the lightbulb, so it looks like it’s lit up by magic.
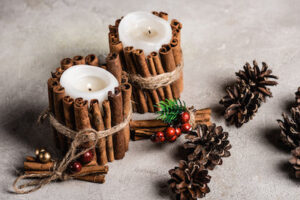
2. DIY Apple Cinnamon Candles
 What You Need:
- apple scented candle
- cinnamon sticks
- thick rubber band
- burlap twine
- ribbon (any color you choose)
Directions:
- Place the rubber band around the middle of the candle.
- Place each cinnamon stick behind the rubber band in a circle.
- Once the cinnamon sticks cover the candle, wrap the twine around them several times to create style and cover the rubber band.
- Then place your ribbon in the middle of the twine and make a bow
There you have it! A cute decoration that will smell divine!
3. Snow Globe Without Water
What You Need:
- a mason jar
- hot glue
- small Christmas items such as a mini snowman or Christmas trees
- white spray paint
- glitter
Directions:
- Remove the lid off of your mason jar and spray paint it white.
- Spray your mini Christmas trees and snowmen with spray paint and then sprinkle glitter on them for added flair.
- Once they dry, hot glue the spray-painted items to the mason jar lids.
- Add the fake snow into the mason jar for taste.
- Finally, while the mason jar is turned right side up, turn the lid upside down and screw it back onto the mason jar.
Now when you flip it back over you have snow falling in this waterless snow globe. Super fun!
4. Ornament Center Pieces
 This decoration is slightly less involved, but still super fun! Most of us have Christmas ornaments we love, but maybe don’t work for our tree, so what a better way to display them than on the table!
What You Need:
- a solid colored platter, dish, or basket
- an assortment of ornaments
- added decorations like pinecones, ribbon, or even candy
Directions:
- Pick out a platter that fits the dynamic of your table and is the color you are looking for.
- Choose ornaments that compliment the platter and fit nicely in it.
- Strategically place the ornaments around the platter, be sure to use different shapes and sizes to add dimension.
- Fill the holes with added decorations to create even more dimension and fun!
There you have it, super fun and affordable centerpiece! This works great for Christmas weddings as well.
5. DIY Holiday Card Tree
What You Need:
- staple gun or double-sided tape
- a wall or large board
- Christmas cards of various types and sizes
Directions:
- Paint or choose a large space you can place the Christmas cards on that you don’t mind using an adhesive or staple gun on.
- Figure out how you can each Christmas card placed to create a large to small effect.
- Start at the bottom and evenly adhere or staple each Christmas card evenly spaced from each other. It doesn’t matter how many are on each row, that just depends on the size of each card. The goal is to have each row look smaller as you go up.
- Strategically place each card to create a pyramid effect. Make sure each card fits and almost creates a puzzle piece effect.
- Finally, you should end with one card at the top.
This is a great idea if you have saved a bunch of Christmas cards over the years but don’t know what to do with them. You could even do a smaller scale version for this on the fridge.
6. Homemade Advent Calendar
What You Need:
- a large stick
- yarn
- 25 sturdy paper clips
- sharpie
- number stencils (optional)
- hot glue
- brown paper sacks (make sure they are not wrinkled)
- goodies to put in each bag
Directions:
- Number 25 brown paper sacks with a sharpie (using your stencil) 1-25.
- Tie 5 long pieces of yarn to the stick (make sure they are evenly spaced out).
- Open each brown paper bag and place the goodies inside.
- Fold over the top of each bag.
- Use the paper clip to keep the bag folded down and anchor the bag to the piece of yarn using the paper clip. You want 5 rows of 5 in numerical order.
- Once all the bags are evenly spaced and ordered correctly you can use hot glue if the bags aren’t staying.
There you have it – a fun and rustic advent calendar the whole family can enjoy!
7. Candy Cane Place Holders
What You Need:
- small candy canes, any color you choose
- card stock
- labels
- hot glue
Directions:
- Grab 3 mini candy canes and place them in a tripod shape.
- Once you get them in the desired configuration and it is stable on its own, hot glue the candy canes together from the back.
- Tie a bow around it (this is optional).
- Grab card stock and make a label that fits in well on the candy canes.
- Label the card stock with your guests’ names in a cool font.
- Place the cards in each candy cane holder.
You have a fun placeholder that can make your table look festive on Christmas Day!
8. Bottle Cap Ornament
What You Need:
- ribbon (thicker)
- bottle caps
- white paint
- lettered stickers
- hot glue
Directions:
- Choose a word you want to spell out with bottle caps.
- Grab a bottle cap for each letter in that word and paint it white.
- On the top of each cap peel off the letter sticker and place it in the middle of the bottle cap.
- Once you have your word spelled out on the bottle caps, cut a ribbon that is long enough to display the bottle caps vertically.
- Hot glue each bottle cap onto the ribbon in the correct order, make sure it is evenly spaced.
- Loop the top of the ribbon so you can hang it on the tree.
This decoration is so versatile you can do words, pictures and choose any color scheme you like!
9. Pine Cone Garland
 What You Need:
- pinecones
- burlap twine
- white spray paint
- foam brushes
- spray sealant
- screw eye hooks
- pliers
Directions:
- Take your pinecones and spray each one with white spray paint. You only want to give the pinecones frosted tips so don’t apply too much. Spray the eye hooks as well.
- Once the pinecones and hooks are dry, use your pliers to screw the eye hooks into the bottom of the pinecone.
- Then begin threading a long piece of twine through each eye hook creating a knot around each one. This will secure them in place.
- Make sure you are spacing the pinecones out evenly to create a uniform look.
- Once all of the pinecones are strung on the twine, place the garland anywhere you would like.
This is going to add that perfect winter frosted feel to your home!
DIY Tips for Success
To save money on your DIY Christmas decorations, try using things that can be found around the house. Old newspapers are great for making colorful garlands that will not hurt your pocket. You can also use cut-up cereal boxes or toilet paper rolls to make fun and unique shapes of Santa Claus, reindeer, etc.
- Use colors that are in season or that you love! I used red, orange, green, and yellow because they’re my favorite colors.
- Keep your workspace clean! It will be very frustrating if you spend forever making something only to accidentally drop some of the pieces and ruin everything.
- Don’t stress yourself out too much about making these things perfect. It is unrealistic that everything you make is going to be flawless unless you are a professional decorator or artist.
- Be adventurous and creative! Don’t just stick with the traditional red and green colors. Try different things. Maybe green and blue would look nice? Think outside of the box!
Final Thoughts
I hope these decorations will work well for you in your hope! Remember, don’t stress out about imperfections. Also, make sure to put your own personal touches on each decoration, personal flair is what makes it special!
