The Art of Brick Matching: Repairing Homes Right
How are old bricks matched with new ones without creating an eyesore? One of the most daunting challenges homeowners and renovators face during renovations is ensuring that new bricks harmoniously blend with the old. Fortunately, with the right techniques and keen attention to detail, a home repair can blend seamlessly with the original structure.
Navigating this craft can seem overwhelming, but it’s wholly achievable with the right approach. This blog promises to unveil the secrets of perfect brick matching, ensuring that home repairs don’t just look good, but look right. So, keep reading on to learn more!
Understanding the Importance of Brick Matching
Brick matching is not merely about finding bricks that look similar. It’s a science that demands a meticulous understanding of various factors to ensure that replaced or repaired bricks blend seamlessly with the original structure. The art of brick matching combines expertise, technology, and meticulous attention to detail. Perfectly matched bricks play a pivotal role in preserving the architectural integrity and aesthetic appeal of buildings. Thus making it very important in construction and restoration projects.
Factors to Consider for Brick Matching
1. Color and Texture
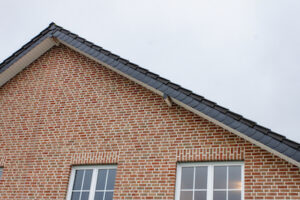
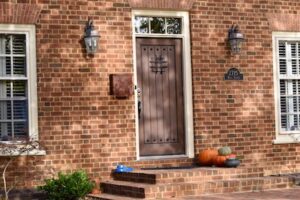
The color and texture of bricks can vary significantly depending on factors such as the type of clay, firing process, and weathering. Before embarking on a repair project, collect samples of the existing brick to help you identify the key characteristics that need to be matched.
2. Size and Shape
Bricks come in various sizes and shapes. Ensuring the new bricks are the same size and shape as the existing ones is crucial for maintaining a uniform appearance. Measure the dimensions accurately and select bricks that closely match.
3. Weathering and Aging
Newly installed bricks often appear more vibrant and clean than older ones that have been exposed to weathering. This aging process can be due to natural factors like exposure to the sun, rain, and frost, or human-made influences like pollution. When matching bricks, it’s crucial to account for how the new bricks will age alongside the old ones to ensure a consistent look over time. To achieve a seamless blend, consider artificially aging the new bricks using techniques like staining or applying a weathered finish.
4. Mortar Color
Mortar plays a significant role in the appearance of a brick wall. The color and texture of the mortar should also match the existing mortar as closely as possible. This might involve experimenting with different mortar mixtures and pigments.

How to Match Bricks on a House
Matching bricks for repair or addition is an integral step to maintaining the consistent appearance of a house. It’s not just about finding bricks that look somewhat similar; the goal is to achieve a seamless blend between the old and new.
1. Sample Collection
Begin by obtaining a sample brick from the house. If that’s not feasible, taking detailed photographs under various lighting conditions can serve as an invaluable reference. This sample or image will be instrumental when communicating with suppliers or comparing available stock.
2. Local Sources
The first stop should ideally be local brick suppliers. Bricks often have regional variations due to the source of the clay or local manufacturing practices. By starting locally, it’s more likely to find a brick that matches or closely resembles the sample.
3. Custom Solutions
There are specialized services that offer custom brick manufacturing. They can recreate bricks that not only mimic the appearance of the original but also match in terms of durability and other properties. Although this route might be more expensive, it guarantees a harmonious integration with the existing brickwork.
Assessing Brick Damage
Brickwork, with its sturdy appeal and ageless beauty, forms the cornerstone of countless structures worldwide. But like all materials, bricks can degrade over time, necessitating timely repair to ensure they maintain both their aesthetic and structural roles. Embarking on a brick repair journey involves several key steps, each demanding careful attention and expertise.
Before diving into repairs, it’s crucial to assess the extent and nature of the brick damage. This is more than a cursory look; it’s about understanding what caused the damage and its implications.
- Type of Damage: Is it a mere surface crack, efflorescence (a white, powdery substance on the brick’s surface), or is the brick crumbling? The type dictates the repair strategy.
- Extent: If it’s a single brick or a small cluster, repairs are more straightforward. But widespread damage might hint at foundational or structural issues.
- Cause: It’s pivotal to determine the root cause. Be it water leakage, frost damage, or shifting foundations, understanding the cause ensures that the repair isn’t just superficial but addresses the underlying issue.
Understanding and assessing brick damage is a nuanced task that requires both observation and comprehension. Beyond the immediate aesthetic concerns, it’s about safeguarding the structure’s integrity and longevity. By accurately gauging the damage type, its extent, and the underlying causes, one can craft a holistic repair approach that ensures not just a visual remedy but a foundational and lasting solution.
Step-by-Step Guide to Repairing Damaged Bricks
Repairing damaged bricks is an intricate process that involves precision and care. A detailed breakdown of each step is crucial for ensuring that the repair is both functional and aesthetically pleasing.
Step 1. Safety First
Safety should always be the primary concern when embarking on any repair task. Bricks and mortar can produce fine particles that are harmful when inhaled. The use of safety glasses protects the eyes from flying debris, especially when chiseling or hammering. Gloves protect the hands from abrasions and sharp edges. A dust mask helps prevent the inhalation of harmful particles, safeguarding respiratory health.
Step 2. Remove Damaged Brick
The removal process is delicate. Utilize a chisel and hammer, starting with gentle taps to avoid unnecessary damage. Carefully chisel away the mortar surrounding the damaged brick. As the brick loosens, extract it gently, being mindful of not causing harm to the adjacent bricks, which are often interconnected in terms of structural integrity.
Step 3. Prepare the Cavity
Once the brick is removed, it is likely to find remnants of old mortar, dust, and possibly debris. A thorough cleaning ensures that the new mortar adheres properly and that the replacement brick sits snugly. Additionally, moisture can compromise the bonding ability of the mortar. If the cavity feels damp, allow adequate time for the area to dry naturally before proceeding.
Step 4. Prepare Replacement Brick
There’s a possibility that the replacement brick might not be an exact fit. If it’s slightly larger, it can interfere with the uniformity of the brick layout. In such cases, the brick can be trimmed using a brick set and hammer. While doing so, ensure that only small bits are taken off at a time to avoid over-trimming.
Step 5. Mix Mortar
Mortar acts as the adhesive that holds bricks together. Its consistency is vital for a strong bond. When mixing, refer to the manufacturer’s guidelines to get the perfect blend. Mortar that’s too wet can weaken the bond, while overly dry mortar won’t adhere properly. Achieving a balanced consistency, akin to peanut butter, often works best.
Step 6. Install the Brick
Apply a generous amount of mortar to the bottom of the cavity to provide a base. Position the replacement brick over the cavity, and gently press it down, ensuring it sits level with its neighbors. The aim is to ensure the brick’s alignment with the surrounding ones to maintain a consistent facade.
In essence, brick repair is both a craft and a science. By following these detailed steps meticulously, it is ensured that the repair stands the test of time, both functionally and visually.

Frequently Asked Questions (FAQs)
Is it essential to find an exact match for brick repairs?
It’s ideal to find an exact match, but it’s not always possible due to variations in brick production over time. Focus on achieving a harmonious blend that is visually appealing.
Can I use paint to match the color of new bricks with old ones?
Using paint is generally not recommended for brick matching, as it can create an artificial appearance and may not age well. Opt for staining or weathering techniques for more natural results.
Should I replace an entire wall if I can’t find a suitable brick match?
Complete replacement should be a last resort. Instead, explore mix-and-match options and artificial weathering techniques to create a cohesive look without replacing the entire wall.
Can a professional mason help with brick matching?
Absolutely. Experienced masons have the skills and knowledge to identify suitable brick matches and execute the repair with precision. Their expertise can save you time and effort in the long run.
How can I prevent the need for future brick repairs?
Regular maintenance, such as sealing and cleaning, can extend the life of your bricks. Additionally, addressing minor issues promptly can prevent them from escalating into major repairs.
Conclusion
When it comes to maintaining the classic beauty of brick structures, attention to detail is crucial. A successful brick match not only repairs a wall but also preserves the historical stories embedded in those old walls. It ensures that the overall narrative remains consistent and harmonious.
As restoration projects finish, let’s keep in mind the importance of each brick and its role in the broader history. With patience, expertise, and a careful approach, every repair can honor the legacy of a home, allowing its stories to endure for generations.
